Recetas de marisco o pescado - Seafood and fish recipes

8 Items

Products

Falso tartar de ventresca de bonito - Fake tuna belly tartar

Categoria

Detalles📌 Ingredientes: ✔ 1 lata de ventresca de bonito en conserva ✔ 1 cucharadita de mostaza ✔ 1 cucharadita de salsa Perrins ✔ 1 cucharadita de soja ✔ 1 cucharada de alcaparras ✔ 1 cucharada de pepinillos en vinagre ✔ 1 cucharada de cebolleta ✔ 1 yema de huevo ✔ Pimienta negra y aceite de oliva virgen extra 🥄 Preparación: 1️⃣ Pica muy fino las alcaparras, los pepinillos y la cebolleta. 2️⃣ Mezcla en un bol con la mostaza, la salsa Perrins y la soja. 3️⃣ Desmenuza la ventresca con cuidado y mézclala con los ingredientes anteriores. 4️⃣ Sirve en un molde redondo para darle forma. 5️⃣ Coloca la yema de huevo encima y añade un toque de pimienta y un chorrito de AOVE. 🔥 ¡Listo para disfrutar de un tartar espectacular en pocos minutos! Acompáñalo con tostas de pan crujiente y sorprende con su sabor.
Details📌 Ingredients: ✔ 1 tin of canned tuna belly fillets ✔ 1 teaspoon mustard ✔ 1 teaspoon Perrins sauce ✔ 1 teaspoon soy sauce ✔ 1 tablespoon capers ✔ 1 tablespoon pickled gherkins ✔ 1 tablespoon spring onions ✔ 1 egg yolk ✔ Black pepper and extra virgin olive oil 🥄 Preparation: 1️⃣ Finely chop the capers, gherkins and spring onion. 2️⃣ Mix in a bowl with the mustard, Perrins sauce and soy. 3️⃣ Carefully crumble the ventresca and mix with the above ingredients. 4️⃣ Serve in a round mould to shape. 5️⃣ Place the egg yolk on top and add a dash of pepper and a splash of EVOO. Ready to enjoy a spectacular tartar in just a few minutes! Serve it with crusty bread toasts and surprise with its flavour.
Empanada de berberechos - Cockle pie

Categoria

DetallesSolo necesitas preparar un relleno con:⁣ ⁣➡Berberechos⁣ ⁣➡Cebolla⁣ ⁣➡Pimiento rojo⁣ ⁣⁣ ⁣Solo hay que sofreír la cebolla con el pimiento, añadir un poco de pimentón dulce y retirar del fuego. Después, extiende la mezcla sobre la base de la empanada y distribuye uniformemente los berberechos por encima. Cierra la empanada y métela en el horno… ¡y a disfrutar!⁣
DetailsYou just need to prepare a filling with. ➡Cockles ➡Onion ➡Red pepper Just fry the onion with the pepper, add a little sweet paprika and remove from the heat. Then spread the mixture over the base of the pie and evenly distribute the cockles on top. Close the pie and put it in the oven... and enjoy!
Pastel de atun - Tuna cake

Detalles Para elaborar este pastel de atún claro, vamos a utilizar atún en conserva en lugar de pescado fresco. Esto nos facilitará la elaboración porque es un producto que siempre tenemos a mano, y además el sabor del atún en conserva es mucho más suave y recomendable para esta receta. Dentro de las distintas conservas que pueda haber, recomendamos utilizar atún claro al natural o en agua. En este tipo de conservas el sabor del atún es neutro, de lo contrario nos podría quedar regustillo a aceite o a escabeche. Así, utilizar conservas en agua es mucho más idóneo para preparar un pastel de atún. En caso de no disponer de ello, nos aseguramos de escurrir bien el atún a emplear. Ingredientes Receta para 6 personas 1 tarro de atún claro al natural Leche evaporada 6% (envase de 500ml que encontraremos en el supermercado) 60 gr de salsa de tomate 3 huevos grandes Tres rebanadas de pan de molde Para el pastel de atún te recomendamos 1 tomate Mayonesa Cebollino Molde para el pastel (1 litro de capacidad) ¿Cómo preparar el pastel de atún al horno? 1. En un bol, coloca el atún claro desmenuzado, la leche evaporada, la salsa de tomate, los tres huevos y las rebanadas de pan sin corteza. Tritura bien hasta obtener una mezcla suave y homogénea, asegurándote de que no queden grumos. Este paso es fundamental para lograr una textura fina en el pastel. 2. Precalienta el horno a 200°C. Coloca una bandeja con agua en su interior para usar como baño María. Esto asegurará una cocción suave y uniforme para el pastel, evitando que se reseque. 3. Engrasa el molde con mantequilla o aceite, preferiblemente uno rectangular tipo plum cake. Vierte la mezcla del pastel en el molde y cúbrelo bien con papel de aluminio. Asegúrate de que el papel esté bien ajustado para evitar que entre agua durante la cocción. 4. Coloca el molde en la bandeja con agua caliente y cocina durante 45-50 minutos a 170°C. Usa una brocheta o un cake tester para verificar si está bien cocido. Debe salir limpio, lo que indica que el pastel está en su punto. 5. Deja enfriar el pastel antes de desmoldar para que mantenga su forma. Decora el pastel con cubos de tomate, cebollino picado y mayonesa cas
DetailsTo make this light tuna cake, we are going to use tinned tuna instead of fresh fish. This will make it easier for us to make because it is a product that we always have to hand, and also the taste of tinned tuna is much milder and more suitable for this recipe. Among the different types of canned tuna available, we recommend using light tuna in water or water-packed. In this type of can, the flavour of the tuna is neutral, otherwise we might get an aftertaste of oil or pickling. So, using water-packed tuna is much more suitable for preparing a tuna cake. If you don't have any, make sure you drain the tuna you are going to use well. Ingredients Recipe for 6 people 1 jar of light tuna in water 6% evaporated milk (500ml pack found in the supermarket) 60g tomato sauce 3 large eggs Three slices of sandwich bread For the tuna cake we recommend 1 tomato Mayonnaise Chives Cake tin (1 litre capacity) How to prepare the baked tuna cake? 1. Place the flaked white tuna, the evaporated milk, the tomato sauce, the three eggs and the slices of bread without the crust in a bowl. Blend well until you obtain a smooth and homogeneous mixture smooth and homogeneous, making sure there are no lumps. This step is essential to achieve a fine texture in the cake. 2. Preheat the oven to 200°C. Place a tray with water in it to use as a bain marie. This will ensure that the cake cooks gently and evenly, preventing it from drying out. 3. Grease the mould with butter or oil, preferably a rectangular plum cake mould. Pour the cake mixture into the mould and cover tightly with aluminium foil. Make sure the foil is tightly fitted to prevent water from entering during cooking. 4. Place the mould on the tray with hot water and cook for 45-50 minutes at 170°C. Use a skewer or a cake tester to check if it is cooked through. It should come out clean, which indicates that the cake is ready. 5. Leave the cake to cool before removing from the tin so that it keeps its shape. Decorate the cake with tomato cubes, chopped chives and homemade mayonnaise around the edge using a pastry bag, for a more professional presentation.
Xató o Xatonada - Catalonian salad

DetallesReceta de Xató o Xatonada Receta para 4 personas Ingredientes 1 lata de Anchoas del Cantábrico 1 tarro de Bonito del Norte al natural Bacalao 1 escarola Aceitunas negras Para la salsa romesco necesitaremos: Tomates Ajos Ñoras y pimientos de choricero Almendras Avellanas Una rebanada de pan Aceite Vinagre Pimienta Sal Preparación de la salsa romesco Para preparar la salsa romesco, lo primero que debemos hacer es “escalivar” los tomates y los ajos, es decir, asarlos en el horno. Para hacerlo más rápido, podemos hacerlo en el microondas, a potencia máxima durante 5 minutos. Por oto lado ponemos agua a hervir en una cacerola e introducimos la ñora y el pimiento de choricero para escaldar. La idea es que podamos extraer la carne de éstos, por lo que el escaldado nos facilitará este trabajo. En el momento en que la ñora y el pimiento de choricero pierdan la arrugas que tienen en un inicio, significa que los podemos retirar del fuego. Por otro lado, freímos una rebanada de pan en una sartén y tostamos las almendras. Podemos aprovechar el pan que nos haya sobrado del día anterior Una vez tengamos preparados los 3 pasos anteriores, ponemos los tomates asados, ajos asados, 1 ajo crudo, las almendras tostadas, las avellanas y la rebanada de pan en un mortero. De la ñora y el pimiento choricero cogemos solo la carne con una cuchara y lo añadimos al mortero. Finalmente se añaden el vinagre, el aceite, la sal y la pimienta. Preparación del Xató Para el Xató, ponemos en un recipiente la escarola lavada y cortada. Añadimos el bacalao y el atún, y depués echamos por encima la salsa romesco. Finalmente añadimos las anchoas y las aceitunas negras.
DetailsXató or Xatonada recipe Recipe for 4 people Ingredients 1 tin of Cantabrian anchovies 1 jar of natural bluefin tuna Cod 1 escarole Black olives For the romesco sauce we will need: Tomatoes Garlic Chilli peppers and choricero peppers Almonds Hazelnuts A slice of bread Oil Vinegar Pepper Salt Preparation of the romesco sauce To prepare the romesco sauce, the first thing we have to do is to ‘escalivate’ the tomatoes and the garlic, that is to say, roast them in the oven. To do it more quickly, we can do it in the microwave, at maximum power for 5 minutes. On the other hand, we put water to boil in a saucepan and add the ñora and the choricero pepper to blanch. The idea is that we can extract the flesh from these, so blanching will make this easier. As soon as the ñora and the choricero pepper lose the wrinkles they have at the beginning, it means that we can remove them from the heat. On the other hand, fry a slice of bread in a frying pan and toast the almonds. We can use the bread left over from the day before Once we have prepared the 3 previous steps, put the roasted tomatoes, roasted garlic, 1 raw garlic clove, the toasted almonds, the hazelnuts and the slice of bread in a mortar. From the ñora and the choricero pepper, we take only the flesh with a spoon and add it to the mortar. Finally, add the vinegar, oil, salt and pepper. Preparation of the Xató For the Xató, place the washed and chopped escarole in a bowl. Add the cod and tuna, and then pour the romesco sauce over the top. Finally add the anchovies and black olives.
Ensalada de gulas con tomate - Elver salad with tomatoes

DetallesReceta de ensalada de gulas con tomates Receta para 2 personas Ingredientes 1 tarro de Arroyabitos (gulas al ajillo) Tomates cherry 1 pepino 1 diente de ajo Comino molido Aceite de oliva Sal Preparación de las gulas al ajillo En primer lugar vamos a preparar las gulas. Para ello pasamos el contenido del tarro de Arroyabitos por un colador, separando el aceite y las gulas (y la gindilla) del interior. Vertemos el aceite en una sartén, lo calentamos y añadimos un diente de ajo cortado en láminas. Una vez que el ajo esté dorado, añadimos las gulas y la guindilla y lo cocinamos durante 1-2 minutos. Otra posibilidad es la de escurrir bien los Arroyabitos y añadirlos a la ensalada directamente en frio, aunque nosotros recomendamos cocinarlo porque adquiere un sabor mucho más intenso y porque conseguiremos una ensalada tibia, ya que mezclamos gulas cocinadas con verduras frescas. También se puede calentar el tarro de Arroyabitos en el microondas y después escurrir las gulas para añadir a la ensalada. Preparación de la ensalada de gulas Ponemos en una ensaladera tomates cherry cortados por la mitad y el pepino cortado en dados. Condimentamos todo ello con sal y comino molido. Ya solo nos queda añadir los Arroyabitos bien escurridos a la ensalada, aliñar con aceite de oliva y mezclar todo bien. ¡Tendremos una ensalada tibia lista en menos de 15 minutos!
DetailsRecipe for gulas (elver) salad with tomatoes Recipe for 2 people Ingredients 1 jar of Arroyabitos (elvers in garlic sauce) Cherry tomatoes 1 cucumber 1 clove of garlic Ground cumin Olive oil Salt Preparation of the elvers in garlic sauce First of all we are going to prepare the elvers. To do this, we pass the contents of the Arroyabitos jar through a sieve, separating the oil and the baby eels (and the chilli) inside. We pour the oil into a frying pan, heat it up and add a clove of garlic cut into slices. Once the garlic is golden brown, we add the baby eels and the chilli and cook for 1-2 minutes. Another option is to drain the Arroyabitos well and add them to the salad straight from the fridge, although we recommend cooking them because they acquire a much more intense flavour and because we will end up with a warm salad, as we mix cooked elvers with fresh vegetables. You can also heat the jar of Arroyabitos in the microwave and then drain the elvers to add to the salad. Preparation of the elver salad Put the halved cherry tomatoes and diced cucumber in a salad bowl. Season with salt and ground cumin. All that remains is to add the well-drained Arroyabitos to the salad, dress with olive oil and mix well. We will have a warm salad ready in less than 15 minutes!
Croquetas de sardinillas y mejillones - Sardine and mussel croquettes

DetallesIngredientes para croquetas de sardinillas y mejillones Receta para 4 personas 1 lata de mejillones en conserva 1 lata de sardinillas en conserva 3 huevos Pan rallado 1 cebolla 40 gr. de harina 500 gr. de leche desnatada 40 gr. de aceite de oliva ¿Cómo preparar croquetas de mejillones y sardinas en lata? Aunque tradicionalmente las croquetas de sardinillas y mejillones han sido un recurso para aprovechar la carne utilizada para cocinar una sopa, las conservas son un ingrediente ya elaborado que tenemos siempre a mano. Además, en el caso de que tengamos niños en casa, conseguiremos que estos coman uno de los alimentos que menos les gusta y que es necesaria para su alimentación; el pescado. 1. Preparar la bechamel para el relleno: Calentar 3-4 cucharadas de aceite de oliva virgen extra en una sartén grande a fuego medio. Añadir una cebolla mediana cortada en brunoise (trozos pequeños y uniformes) y sofreír durante unos 5-7 minutos. Remueva ocasionalmente, hasta que esté dorada y translúcida, lo que permitirá liberar todo su dulzor y sabor. La cebolla debe quedar bien pochada para aportar dulzura y textura a la bechamel. Agregar la harina de trigo a la sartén y mezclar bien con la cebolla. Luego cocinaremos la mezcla durante 2-3 minutos, removiendo constantemente para tostar la harina y eliminar su sabor crudo. Es importante no dejar de remover para evitar que se formen grumos y conseguir una bechamel suave y homogénea. 2. Incorporar la leche caliente: Calentar 500 ml de leche desnatada y añadirla poco a poco a la sartén, sin dejar de remover. Vierta la leche gradualmente mientras se remueve vigorosamente con unas varillas o una espátula de madera para conseguir una bechamel sin grumos. Continuar removiendo hasta que la mezcla espese y tenga una consistencia suave y cremosa. Este proceso puede llevar unos 10-12 minutos a fuego medio-bajo. Si la bechamel está demasiado espesa, se puede ajustar con un poco más de leche caliente. 3. Añadir los mejillones y sardinillas: Abrir la lata de mejillones en conserva y escurrir bien el líquido. Hacer lo mismo con la lata de sardinillas. Trocear los mejillones y las sardinillas en pedazos pequeños y añadirlos a la bechamel. Mezclar bien hasta que los mejillones y sardinillas estén bien integrados en la masa. Ajustar de sal y pimienta al gusto, teniendo en cuenta que los mejillones y las sardinillas ya contienen algo de sal. Remover durante un par de minutos más para que los sabores se integren bien en la bechamel. 4. Dejar reposar y enfriar la masa: Verter la masa en una bandeja o fuente amplia, extendiéndola para facilitar el enfriado. Cubrir con papel film, presionando directamente sobre la superficie de la masa para evitar que se forme costra. Dejar templar a temperatura ambiente y luego refrigerar durante al menos 2 horas, o hasta que la masa esté completamente fría y sólida. Este paso es esencial para que las croquetas mantengan su forma al moldearlas. 5. Formar las croquetas: Con las manos ligeramente enharinadas o usando dos cucharas, tomar porciones de masa y formar pequeñas bolas o cilindros del tamaño deseado. Colocar las croquetas formadas en una bandeja y mantenerlas en el frigorífico mientras preparas el rebozado, para asegurar que conserven su consistencia firme. 6. Rebozar las croquetas: Batir 3 huevos con una pizca de sal en un bol amplio. Preparar otro recipiente con pan rallado. Cogemos las bolas que hemos hecho con la masa y los pasamos por huevo batido y pan rallado, asegurándose de cubrirlas bien por todos lados. Para un rebozado extra crujiente, se puede repetir el proceso (huevo y pan rallado) una segunda vez. 7. Freír las croquetas: Calentar abundante aceite de oliva en una sartén profunda o freidora a 180°C. Asegúrate de que el aceite esté bien caliente antes de empezar a freír, para que las croquetas queden doradas y crujientes sin absorber demasiado aceite. Freír las croquetas en tandas pequeñas, para evitar que la temperatura del aceite baje bruscamente. Cocinarlas durante unos 2-3 minutos o hasta que estén doradas y crujientes por fuera. Retirar las croquetas con una espumadera y colocarlas sobre papel de cocina para eliminar el exceso de aceite. 8. ¡Servir y disfrutar! Servir las croquetas bien calientes, acompañadas de una rodaja de limón o una salsa de tu elección, como alioli o mayonesa. Disfruta de estas croquetas crujientes por fuera y cremosas por dentro, con un delicioso sabor a mariscos en cada bocado.
DetailsIngredients for sardine and mussel croquettes Recipe for 4 people 1 tin of mussels in sauce 1 tin of sardines in sauce 3 eggs Breadcrumbs 1 onion 40 g flour 500 g skimmed milk 40 g olive oil How to prepare croquettes with tinned sardines and mussels? Although traditionally sardine and mussel croquettes have been a way of using up the meat used to cook a soup, tinned fish is a ready-made ingredient that we always have to hand. What's more, if we have children at home, we can get them to eat one of the foods they like least and that is necessary for their diet: fish. 1. Prepare the béchamel sauce for the filling: Heat 3-4 tablespoons of extra virgin olive oil in a large frying pan over a medium heat. Add a medium onion cut into brunoise (small, uniform pieces) and fry for about 5-7 minutes. Stir occasionally until it is golden and translucent, which will allow it to release all its sweetness and flavour. The onion should be well poached to add sweetness and texture to the béchamel sauce. Add the wheat flour to the frying pan and mix well with the onion. Then cook the mixture for 2-3 minutes, stirring constantly to toast the flour and eliminate its raw flavour. It is important to keep stirring to prevent lumps from forming and to achieve a smooth and homogeneous béchamel sauce. 2. Incorporate the hot milk: Heat 500 ml of skimmed milk and add it little by little to the pan, stirring constantly. Pour in the milk gradually while stirring vigorously with a whisk or wooden spatula to achieve a lump-free béchamel sauce. Continue stirring until the mixture thickens and has a smooth, creamy consistency. This process can take about 10-12 minutes over medium-low heat. If the béchamel is too thick, it can be adjusted with a little more hot milk. 3. Add the mussels and sardines: Open the tin of tinned mussels and drain the liquid well. Do the same with the tin of sardines. Cut the mussels and sardines into small pieces and add them to the béchamel sauce. Mix well until the mussels and sardines are well integrated into the mixture. Add salt and pepper to taste, bearing in mind that the mussels and sardines already contain some salt. Stir for a couple of minutes more so that the flavours are well integrated into the béchamel sauce. 4. Leave the mixture to stand and cool: Pour the mixture onto a tray or large dish, spreading it out to help it cool. Cover with cling film, pressing it directly onto the surface of the mixture to prevent a crust forming. Leave to warm to room temperature and then refrigerate for at least 2 hours, or until the mixture is completely cold and firm. This step is essential for the croquettes to keep their shape when moulded. 5. Form the croquettes: With lightly floured hands or using two spoons, take portions of the dough and form small balls or cylinders of the desired size. Place the formed croquettes on a tray and keep them in the refrigerator while you prepare the batter, to ensure that they retain their firm consistency. 6. Coat the croquettes: Beat 3 eggs with a pinch of salt in a large bowl. Prepare another bowl with breadcrumbs. Dip the balls we have made with the dough in the beaten egg and then coat them well in the breadcrumbs, making sure they are well covered on all sides. For an extra crispy coating, you can repeat the process (egg and breadcrumbs) a second time. 7. Fry the croquettes: Heat plenty of olive oil in a deep frying pan or deep fryer to 180°C. Make sure the oil is really hot before you start frying so that the croquettes are golden and crispy without absorbing too much oil. Fry the croquettes in small batches to prevent the oil temperature from dropping sharply. Cook them for about 2-3 minutes or until they are golden and crispy on the outside. Remove the croquettes with a slotted spoon and place them on kitchen paper to remove excess oil. 8. Serve and enjoy! Serve the croquettes piping hot, accompanied by a slice of lemon or a sauce of your choice, such as aioli or mayonnaise. Enjoy these crispy on the outside and creamy on the inside croquettes, with a delicious seafood flavour in every bite.
Empanada de bonito del norte - Tuna pie

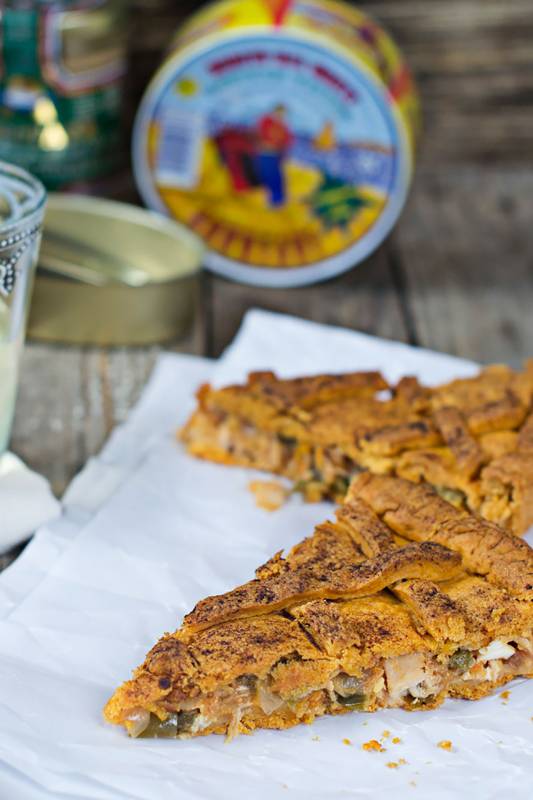
DetallesReceta de empanada de Bonito del Norte Receta para 4 personas Ingredientes 1 lata de Bonito del Norte en escabeche (o salsa) 1 pimiento blanco 1 cebolla 1 huevo cocido 4 tomates 350 gr. de harina de fuerza 20 gr. de levadura 100 ml. de agua 120 ml. de aceite de oliva Pimentón Azúcar Sal Cómo elaborar una empanada de bonito del norte Ponemos a calentar el aceite de oliva, y sin que llegue a humear lo retiramos del fuego. Añadimos el pimentón, lo mezclamos bien con el aceite y lo dejamos enfriar. Así tenemos preparado el aceite de pimentón. Para preparar la masa de la empanada de bonito, se pone la harina en un recipiente, y se hace un hueco en el centro. Vertemos la levadura (que debe ser disuelto en agua previamente), 100 ml de aceite de pimentón y sal. Amasamos todos los ingredientes en el recipiente. Una vez que todos los ingredientes estén bien mezclamos, podemos sacar la masa del recipiente y seguimos amasando en la encimera durante 10 minutos. Cubrimos la masa con aceite de oliva y lo dejamos en el recipiente durante hora y media, hasta que su volumen llegue a ser al menos el doble. 
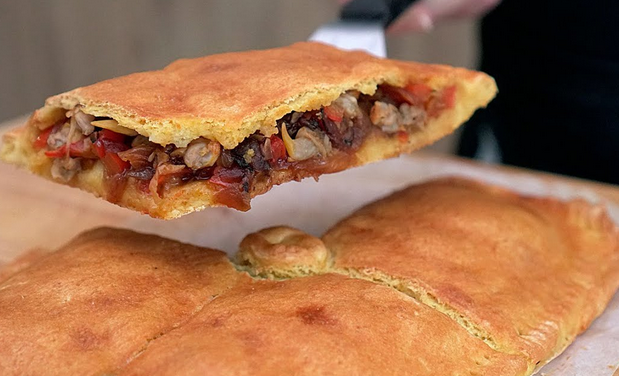
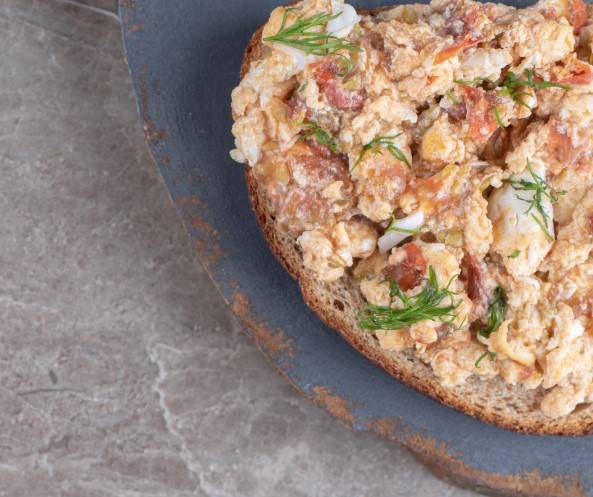
Mientras tanto, ponemos el huevo duro a cocer y picamos la cebollas, el pimiento y los tomates. Después echamos un chorro de aceite de oliva en una sartén y añadimos la cebolla y el pimiento. Una vez que la cebolla esté blanda, echamos los tomates rallados, una cucharada de sal y doble de azúcar; dejando que el tomate se confite. Para que la empanada de bonito quede jugoso, se recomienda cuidar bien dos aspectos: uno, utilizar un Bonito del Norte de alta calidad y jugosidad; y dos, dejar pochar las verduras a fuego bajo, sin prisas. Cuando terminemos de cocinar el pimiento, la cebolla y el tomate, añadimos huevo cocido picado y el Bonito del Norte. Mezclamos todo bien y lo ponemos en reserva. Una vez que la masa este levada, lo dividimos en dos partes, para la base y para la cubierta. Expandimos la parte que vayamos a utilizar como base con un rodillo, y lo ponemos en un molde engrasado con aceite de oliva. Retiramos la masa sobrante y rellenamos todo con el preparado de bonito, huevo y verduras. Para terminar, cubrimos todo con la otra masa. Es importante unir bien las dos partes de la masa apretando con los dedos. Luego podemos decorar el reborde apretando con un tenedor y poniendo unas tiras de masa en la parte superior de la empanada de bonito. También es importante hacer un agujero en el centro, ya que de ahí saldrán los vapores mientras la empanada de bonito se cueza. Cogemos una brocha y aplicamos el aceite de pimentón sobrante en toda la cubierta, intentando no aplicar el pimentón que esté en el fondo de la sartén, ya que se quemará muy fácilmente en el horno. Por tanto, aprovechamos el aceite de pimentón pero utilizando solo el aceite. Introducimos la empanada de bonito en el horno durante 45 minutos a 180ºC. La masa, además de coger un color dorado, debe estar crujiente para que la empanada esté lista. ¡Que aproveche!
DetailsIngredients 1 tin of pickled white tuna (or sauce) 1 white pepper 1 onion 1 boiled egg 4 tomatoes 350 g strong flour 20 g yeast 100 ml water 120 ml olive oil Paprika Sugar Salt How to make a white tuna pie Heat the olive oil, but don't let it smoke. Remove from the heat. Add the paprika, mix well with the oil and leave to cool. This is the paprika oil. To prepare the dough for the tuna pie, put the flour in a bowl and make a well in the centre. Add the yeast (which should be dissolved in water beforehand), 100 ml of paprika oil and salt. Knead all the ingredients together in the bowl. Once all the ingredients are well mixed, we can take the dough out of the bowl and continue kneading on the worktop for 10 minutes. We cover the dough with olive oil and leave it in the bowl for an hour and a half, until its volume has at least doubled. Meanwhile, boil the hard-boiled egg and chop the onion, pepper and tomatoes. Then pour a dash of olive oil into a frying pan and add the onion and pepper. Once the onion is soft, add the grated tomatoes, a tablespoon of salt and twice as much sugar; letting the tomato caramelise. To ensure that the tuna pie is juicy, it is advisable to pay close attention to two aspects: one, use high-quality, juicy Albacore Tuna; and two, let the vegetables simmer over a low heat, without rushing. When we have finished cooking the pepper, onion and tomato, add the chopped boiled egg and the Albacore Tuna. Mix everything well and set aside. Once the dough has risen, divide it into two parts, for the base and for the top. Roll out the part that we are going to use as the base with a rolling pin, and put it in a mould greased with olive oil. Remove the excess dough and fill it all with the tuna, egg and vegetable mixture. To finish, cover everything with the other dough. It is important to join the two parts of the dough together well by pressing with your fingers. Then we can decorate the edge by pressing with a fork and putting strips of dough on the top of the bonito pie. It is also important to make a hole in the centre, as this is where the steam will come out while the bonito pie is cooking. Take a brush and apply the remaining paprika oil all over the top, trying not to use any of the paprika at the bottom of the pan, as it will burn very easily in the oven. So, we use the paprika oil but only use the oil itself. We put the tuna pie in the oven for 45 minutes at 180ºC. The pastry, as well as turning golden brown, should be crispy so that the pie is ready. Enjoy!
Ensalada de anchoas con naranja y lomo asado - Anchovy, orange and roast loin salad

DetallesEnsalada de anchoas con naranja y lomo asado Ingredientes Receta para 2 personas 1 lata de Anchoas del Cantábrico 1 pieza de lomo de cerdo 2 naranjas sanguinas 2 patatas 1 huevo Aceite de girasol Sal gorda ¿Cómo preparar la ensada de anchoas, naranja y lomo asado? 1. Preparación del lomo a la sal 1.1. Precalentar el horno a 180°C. Asegúrate de que el horno alcance esta temperatura antes de introducir el lomo, ya que una cocción uniforme es clave para que la carne quede tierna y jugosa. 1.2. En un recipiente apto para horno, colocar una base de sal gruesa y debe ser lo suficientemente gruesa como para cubrir bien el fondo del recipiente. 1.3. Colocar la pieza de lomo sobre la sal y cubrirla completamente con más sal gruesa, sin dejar espacios. La costra de sal permitirá que la carne se cocine de manera uniforme, sin resecarse, conservando todos sus jugos. 1.4. Introducir el lomo cubierto de sal en el horno precalentado y hornear durante una hora. La cocción al vapor dentro de la costra de sal permitirá que el lomo quede bien cocido por dentro sin perder su ternura. 1.5. Una vez horneado, retirar el lomo del horno y dejar que enfríe. Es importante dejar que el lomo repose unos 10-15 minutos antes de manipularlo, esto asegura que los jugos se redistribuyan dentro de la carne, haciendo que el resultado sea mucho más jugoso y tierno. 1.6. Retirar toda la sal de la superficie del lomo antes de usarlo en la ensalada. 2. Preparación de la mayonesa de anchoas En segundo lugar, vamos a preparar la mayonesa de anchoas, que se prepara igual que una mayonesa de toda la vida a la que se le añaden anchoas para darle su punto de sal. 2.1. Colocar dos anchoas y un huevo en el vaso de la batidora. Si prefieres una textura más fluida, puedes añadir un poco de agua. 2.2. Batir los ingredientes durante unos segundos hasta que las anchoas comiencen a integrarse con el huevo. 2.3. Luego vamos añadiendo poco a poco aceite de girasol mientras sigues batiendo, sin detenerte, hasta que la mayonesa tome cuerpo. Añade el aceite en un hilo fino y constante para evitar que la mayonesa se corte. 2.4. Si notas que la mayonesa ha quedado un poco sosa, puedes agregar más anchoas al final y batir nuevamente hasta obtener el punto de sal deseado. 3. Elaboración de la ensalada de anchoas Una vez que tenemos el lomo a la sal y la mayonesa, procedemos a preparar la ensalada de anchoas, añadiendo la naranja y la patata. 3.1. Cocemos las patatas enteras, con piel y todo en una olla durante 20 minutos aproximadamente. Una vez cocidas, las dejamos enfriar, las pelamos y cortamos las patatas en tacos grandes. 3.2. Hacemos lo mismo con el lomo a la sal. Cortamos dos lonchas gruesas y lo cortamos en cuadrados. Ponemos los tacos de patatas y de lomo en un recipiente. 3.3. A continuación pelamos las naranjas a lo vivo, es decir, pelamos la piel de la naranja, incluida toda la parte blanca que cubre la naranja. (puedes verlo en este vídeo) 3.4. Para finalizar, mezclamos todos los ingredientes de nuestra ensalada de anchoas, naranja y lomo asado. Para ello añadimos la mayonesa al recipiente en el que están el lomo y las patatas y lo mezclamos todo. Decoramos la ensalada con unos gajos de naranja pelados y dos filetes de Anchoas del Cantábrico por persona.
DetailsAnchovy, orange and roast loin salad Ingredients Recipe for 2 people 1 tin of Anchovies from the Bay of Biscay 1 pork loin 2 blood oranges 2 potatoes 1 egg Sunflower oil Coarse salt How to prepare the anchovy, orange and roast loin salad? 1. Preparing the salt-cured pork loin 1.1. Preheat the oven to 180°C. Make sure the oven reaches this temperature before putting the pork loin in, as even cooking is key to making the meat tender and juicy. 1.2. Place a layer of coarse salt in an ovenproof dish, making sure it is thick enough to cover the bottom of the dish. 1.3. Place the piece of pork on top of the salt and cover it completely with more coarse salt, leaving no spaces. The salt crust will allow the meat to cook evenly, without drying out, and retain all its juices. 1.4. Place the salt-covered pork loin in the preheated oven and bake for one hour. Steaming in the salt crust will ensure that the pork loin is cooked through on the inside without losing its tenderness. 1.5. Once baked, remove the pork from the oven and leave to cool down. It is important to leave the pork to rest for 10-15 minutes before handling, this ensures that the juices are redistributed inside the meat, making it much juicier and more tender. 1.6. Remove all the salt from the surface of the pork loin before using it in the salad. 2. Preparation of the anchovy mayonnaise Secondly, we are going to prepare the anchovy mayonnaise, which is made in the same way as a traditional mayonnaise, to which anchovies are added to give it a touch of salt. 2.1. Place two anchovies and one egg in the blender jug. If you prefer a more fluid texture, you can add a little water. 2.2. Beat the ingredients for a few seconds until the anchovies begin to blend with the egg. 2.3. Then gradually add sunflower oil while continuing to beat, without stopping, until the mayonnaise thickens. Add the oil in a thin, steady stream to prevent the mayonnaise from curdling. 2.4. If you feel that the mayonnaise is a little bland, you can add more anchovies at the end and beat again until you get the desired salt level. 3. Preparation of the anchovy salad Once we have the salt-cured pork and the mayonnaise, we proceed to prepare the anchovy salad, adding the orange and the potato. 3.1. Cook the whole potatoes, skin and all, in a saucepan for about 20 minutes. Once cooked, leave them to cool, peel them and cut them into large cubes. 3.2. We do the same with the salt-cured pork. We cut two thick slices and cut it into squares. We put the potato and pork cubes in a bowl. 3.3. Then we peel the oranges the healthy way, that is, we peel the skin of the orange, including all the white part that covers the orange. (you can see it in this video clip) 3.4. Finally, we mix all the ingredients of our anchovy, orange and roast loin salad. To do this, we add the mayonnaise to the container with the pork loin and the potatoes and mix everything together. We decorate the salad with a few peeled orange segments and two Cantabrian anchovy fillets per person.

⚡ Store created from Google Sheets using Store.link